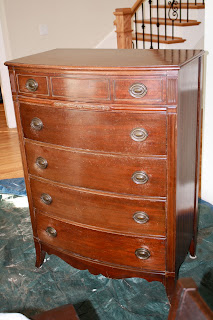
The dresser before
If I was not using chalk paint I would have sanding it down a bit further, trying to get past the original stain color and then I would have primed it. (In case you are using a traditional latex paint to do your piece of furniture.)


I used a hand held rotary sander on the main part and then I went back and sanded with a sanding block after I took off the handles.

This is after one coat of paint. You can paint it on how ever you are comfortable. I used both a sponge roller (I think it was called a trim roller) and a traditional paint brush (I use Purdy bushes).


I used two coats of paint to get an even color. After it has had time to dry (I typically wait until the next day) you can start distressing it.
To get a distressing/chipped paint look get some medium to heavy grit sand paper/or sanding block. I start with the corners and edges. Start lightly-but just start sanding the paint away. You can do as much or as little as you want. It depends on the look you are trying to achieve.

Once you have sanded the edges and sides down to where you like them you can either stain your piece to add a little more to the look or just seal it. Like I said at the beginning, I did not stain this piece because I liked the chalky gray color. Adding stain will change the color of your piece slightly. Depending on the color stain you pick, it may change it a lot. (so just keep that in mind). If you want to know how to use stain to distress your piece, send me a message and write up the step for you.
After I sanded down the edges then I used a water based poly coat to seal and protect it. I chose the satin finish because I didn't want much of a shine on this piece.

The top drawer has a little more detail than the rest, it has a little molding on it to make three skinny rectangles. I thought it would be a good idea to use the middle rectangle size and location as my model/guide. I measure it and then measured each drawer. I wanted to make sure each chalkboard block was centered and the same size. (thanks to my wonderful hubby who helped with all the math and measuring!) I made a template, traced it on each drawer and then taped off each rectangle.

I then added newspaper to the outside edges (since I was using spray paint-chalk board paint). I didn't want it to get on anything or go anywhere other than the center rectangle box.

I took them outside and sprayed them three times over the course of an hour and a half.

The finished product! My newly repainted dresser for Tyler's room.


Now if only my friend Nellie lived a little closer I could have her write on each rectangle and it would look much prettier!!
3 comments:
Thank you Erica! Looks great! I am glad to know how to do this but sad you can't teach me in person. Hope the packing is going smoothly.
xo
hahahaha. if only my friend erica lived closer, i would have cute painted furniture :)
First, thanks so much for joining me at Strictly Homemade Tuesday and I am so glad you did! Second, this dresser looks amazing!! Great job. Third, I really like how you paint in your foyer!! As I tell Collins all of the time craftiness is MESSY!! Get over it. Hope the move is going well!!
Post a Comment